Fork Join technology was introduced with Java version 7, to be able to deal with parallel concurrency.
This technology is based in splitting a task recursively until it is small enough to be performed. The sub-tasks will be executed in parallel in different threads. When the sub-tasks have finished, then a join is invoked to merge the results into one.
Example. The following example is very simple. It consists on a function that calculates consecutive natural numbers in an interval. The class will receive two parameters (number min. and max.). If this interval is greater than 6 (in the example) the task will be split into two sub-tasks.
The class extends RecursiveTask<Long> and implements method compute(). As our class is a task it will be invoked by ForkJoinPool
Output console:
Splitting task
Computing
Result1: 21
Computing
Result1: 57
Result2: 78
Sunday, 17 April 2016
Saturday, 26 March 2016
OCEJBCD -8.Using Timer Services
OCEJBCD (SCBCD) - 1Z0-895 - Enterprise JavaBeans Developer Certification
8.1. Describe timer services
Timer services is a service of scheduling notifications in the bean container.
(Available for all bean types except from stateful session beans).
Timers services can be created
-Programmatically, using TimerService interface
-By annotations @Schedule
Functionality that a bean with timer services can perform:
The timers can be classified as:
8.2. Create a timer notification callback
schedule.dayOfMonth("1,Last");//first and last day of the month
Timer timer = timerService.createCalendarTimer(schedule);
When a timer expires the container calls the bean's method annotated with @Timeout (*Note: this method must return void and the argument is optional).
8.3. Process a timer notification callback
Example with timerService interface
To execute this bean we need to make a call from a client (for example a servlet class) to the method setTimer that indicates the milliseconds after the timeout will happen: scheduleBean.setTimer(30000);
Results in server console:
2016-03-26T11:58:33.313+0000|Info: TestBean was successfully deployed in 362 milliseconds.
2016-03-26T12:00:26.816+0000|Info: the next timeout is programed Sat Mar 26 12:00:56 GMT 2016 happening in 29968 milliseconds
2016-03-26T12:00:56.787+0000|Info: Timeout occurred
Example with schedule annotation
The following example is a stateless session bean, with a timer scheduled every 1 min.
When it is deployed in the server, after 1 minute the timeout method is called:
Results in server console:
2016-03-26T10:03:00.001+0000|Info: Automatic timeout occured
2016-03-26T10:04:00.002+0000|Info: Automatic timeout occured
2016-03-26T10:05:00.001+0000|Info: Automatic timeout occured
2016-03-26T10:06:00.002+0000|Info: Automatic timeout occured
2016-03-26T10:07:00.002+0000|Info: Automatic timeout occured
8.4. Manage timer objects
-Cancel() - cancel a timer
-getHandle() - obtain a serializable object
-getTimeRemaining()
-getNextTimeout()
-getInfo()
When using container-managed transactions @Timeout can use attributes: Required or RequiredNew to preserve transaction integrity, which means that in case of rollback the timeout will be reset.
OCEJBCD (SCBCD) - 1Z0-895 - Enterprise JavaBeans Developer Certification
8.1. Describe timer services
Timer services is a service of scheduling notifications in the bean container.
(Available for all bean types except from stateful session beans).
Timers services can be created
-Programmatically, using TimerService interface
-By annotations @Schedule
Functionality that a bean with timer services can perform:
- Create a timer notification callback
- Process a timer notification callback
- Manage timer objects (list notification, cancel timer etc...)
The timers can be classified as:
- Single notifications
- Interval (multiple notifications at specified interval)
- Calendar based schedule
- second, minute, hour
- dayOfWeek, dayOfMonth
- month
- year
- Expressions : wildcard (*), list(,), range(-),intervals(/)
8.2. Create a timer notification callback
- By timerService interface
- Single:
- Calendar based: using javax.ejb.ScheduleExpression
schedule.dayOfMonth("1,Last");//first and last day of the month
Timer timer = timerService.createCalendarTimer(schedule);
When a timer expires the container calls the bean's method annotated with @Timeout (*Note: this method must return void and the argument is optional).
- By annotation
Example : @Schedule(dayOfWeek="Mon", hour="0")
8.3. Process a timer notification callback
Example with timerService interface
To execute this bean we need to make a call from a client (for example a servlet class) to the method setTimer that indicates the milliseconds after the timeout will happen: scheduleBean.setTimer(30000);
Results in server console:
2016-03-26T11:58:33.313+0000|Info: TestBean was successfully deployed in 362 milliseconds.
2016-03-26T12:00:26.816+0000|Info: the next timeout is programed Sat Mar 26 12:00:56 GMT 2016 happening in 29968 milliseconds
2016-03-26T12:00:56.787+0000|Info: Timeout occurred
Example with schedule annotation
The following example is a stateless session bean, with a timer scheduled every 1 min.
When it is deployed in the server, after 1 minute the timeout method is called:
Results in server console:
2016-03-26T10:03:00.001+0000|Info: Automatic timeout occured
2016-03-26T10:04:00.002+0000|Info: Automatic timeout occured
2016-03-26T10:05:00.001+0000|Info: Automatic timeout occured
2016-03-26T10:06:00.002+0000|Info: Automatic timeout occured
2016-03-26T10:07:00.002+0000|Info: Automatic timeout occured
8.4. Manage timer objects
-Cancel() - cancel a timer
-getHandle() - obtain a serializable object
-getTimeRemaining()
-getNextTimeout()
-getInfo()
When using container-managed transactions @Timeout can use attributes: Required or RequiredNew to preserve transaction integrity, which means that in case of rollback the timeout will be reset.
OCEJBCD (SCBCD) - 1Z0-895 - Enterprise JavaBeans Developer Certification
Sunday, 13 March 2016
How to upload files using Servlet technology
This time, the aim of this post is to describe how to upload files to a server using servlet technology.
Upload files with Java technology is easy, we only need to create a JSP page and a servlet class, but we have to take into account this form will be a bit different than usual:
1) Getting the file attribute from the request object. file attribute corresponds
with the name of the input type ="file" in the JSP. The object obtained is Part type.
2) Obtain the name of the file uploaded:
using filePart.getHeader to obtain the value of the property filename.
3) Defining an object OutputStream with the destination path, plus the file name).
4) Read the content of the object filepart obtained in point 1, and writing the bytes into the ouputStream (in the destination).
Running the application:
http://localhost:8080/UploadWeb/
Select a file from the local disk and click the button to submit the request:
Upload files with Java technology is easy, we only need to create a JSP page and a servlet class, but we have to take into account this form will be a bit different than usual:
- Method POST
- multipart/form-data
Form declaration in the JSP:
<form action="upload" method="post" enctype="multipart/form-data">
Annotations in the servlet declaration:
@WebServlet("/UploadServlet")
@MultipartConfig
public class UploadServlet extends HttpServlet {
JSP code:
Servlet code:
* This example project is using servlet library version 3.0 or above.
Method post - summary:
1) Getting the file attribute from the request object. file attribute corresponds
with the name of the input type ="file" in the JSP. The object obtained is Part type.
2) Obtain the name of the file uploaded:
using filePart.getHeader to obtain the value of the property filename.
3) Defining an object OutputStream with the destination path, plus the file name).
4) Read the content of the object filepart obtained in point 1, and writing the bytes into the ouputStream (in the destination).
Running the application:
http://localhost:8080/UploadWeb/
The server logs will display this message:
INFO: Reloading Context with name [/UploadWeb] is completed
Checking the execution result (the path selected in the example is also a local directory C:/uploads), we can verify the file has been uploaded successfully to the selected destination.
Sunday, 28 February 2016
OCEJBCD -7.Developing Message-Driven Beans
OCEJBCD (SCBCD) - 1Z0-895 - Enterprise JavaBeans Developer Certification
7.1. Understand the short-comings of using session beans as messaging consumers
Using a session bean as consumer has the problem of blocking server resources, because it will be a synchronous process (instead of asynchronous processing with message-driven bean ).
Using session bean receive() method will block the thread indefinitely until the message becomes available :
Message m = consumer.receive()
How to handle the blocking synchronous problem with session bean? Using a timed synchronous receive.
A parameter can be used to indicate the time waiting the message to arrive:
Message m = consumer.receive(1); //time in milliseconds
Message m = consumer.receiveNoWait();
See an example of Writing the Clients for the Synchronous Receive.
Using a session bean as consumer has the problem of blocking server resources, because it will be a synchronous process (instead of asynchronous processing with message-driven bean ).
Using session bean receive() method will block the thread indefinitely until the message becomes available :
Message m = consumer.receive()
How to handle the blocking synchronous problem with session bean? Using a timed synchronous receive.
A parameter can be used to indicate the time waiting the message to arrive:
Message m = consumer.receive(1); //time in milliseconds
Message m = consumer.receiveNoWait();
See an example of Writing the Clients for the Synchronous Receive.
7.2. Describe the properties and life cycle of message-driven beans
7.3. Create a JMS message-driven bean
To create a message-driven bean the bean class:
- is annotated with @MessageDriven
- @ActivationConfigProperty Settings(*):
- Acknownledge_Mode
- Auto-Acknownledge
- Client-Acknownledge
- Dups-ok-aknownledge
- DestinationType
- Queue
- Topic
- Subscription durability
- Durable
- Non-durable
- ClientId
- SusbscriptionName
- MessageSelector
- AddressList
- implements MessageListener inteface
- overrides onMessage() method
(*)Example of @ActivationConfigProperty configuration:
@MessageDriven(mappedName = "jms/Topic", activationConfig = {
@ActivationConfigProperty(propertyName = "messageSelector",
propertyValue = "NewsType = 'Sports' ")
, @ActivationConfigProperty(propertyName = "subscriptionDurability",
propertyValue = "Durable")
, @ActivationConfigProperty(propertyName = "clientId",
propertyValue = "MyID")
, @ActivationConfigProperty(propertyName = "subscriptionName",
propertyValue = "MySub")
})
There is an example of a message-driven bean class at the last section of this post.
7.4. Create life cycle event handlers for a JMS message-driven bean
See this post : Configuring a JMS environment, to know how to configure a server and include jms resources as connection factory and destination
Once the connection factory and the destination(Queue or topic) have been created, we can use dependency injection to use them in our message beans
like:
private QueueConnectionFactory connectionFactory;
private Queue queue;
With the connectionFactory we can define the context to create the producer and the consumer.
Session session = con.createSession(true,0);
7.5. Configure a JMS message-driven bean
Here is an example of using a message-driven bean:
Session bean:
Message bean:
When executing the application in our configured server:
Write a message in the textarea and submit the message.
In the log can be read the producer sending the message and the consumer receiving it:
producer sends the message...
consumer receives message...
OCEJBCD (SCBCD) - 1Z0-895 - Enterprise JavaBeans Developer Certification
- Connection factory
private QueueConnectionFactory connectionFactory;
- Destination
private Queue queue;
With the connectionFactory we can define the context to create the producer and the consumer.
- Connection and Session
Session session = con.createSession(true,0);
- MessageProducer
- Message types(TextMessage, MapMessage, ObjectMessage and others).
7.5. Configure a JMS message-driven bean
Here is an example of using a message-driven bean:
- A client where the user request to send a message (with a jsp page and a servlet, in the same way as examples described in previous posts : calling a session bean from a servlet).
- A session bean (stateless) that will define a producer that put the message in the JMS queue.
- A message-driven bean that will consume the message from the queue.
Session bean:
Message bean:
When executing the application in our configured server:
Write a message in the textarea and submit the message.
In the log can be read the producer sending the message and the consumer receiving it:
producer sends the message...
consumer receives message...
OCEJBCD (SCBCD) - 1Z0-895 - Enterprise JavaBeans Developer Certification
Sunday, 14 February 2016
Configuring a JMS environment
In this post we will see how to create a JMS administered objects (connection factory and a destination) in a glassfish server.
The server must be running.
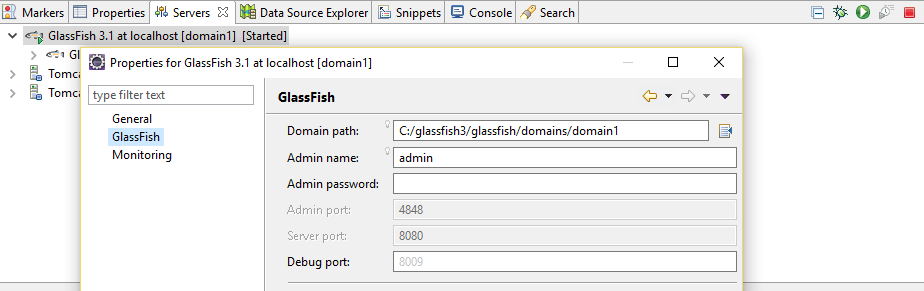
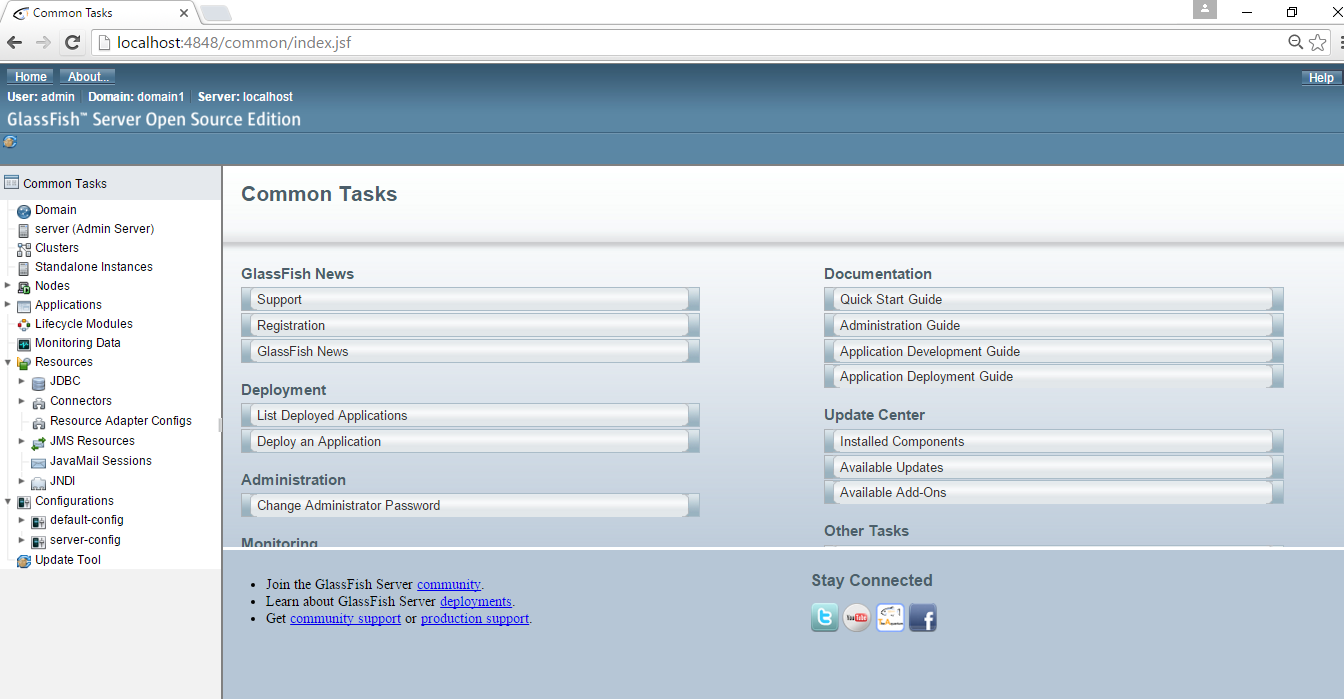
We can see in properties that the admin port is 4848. So the administration console can be opened in a browser with the URL : http://localhost:4848
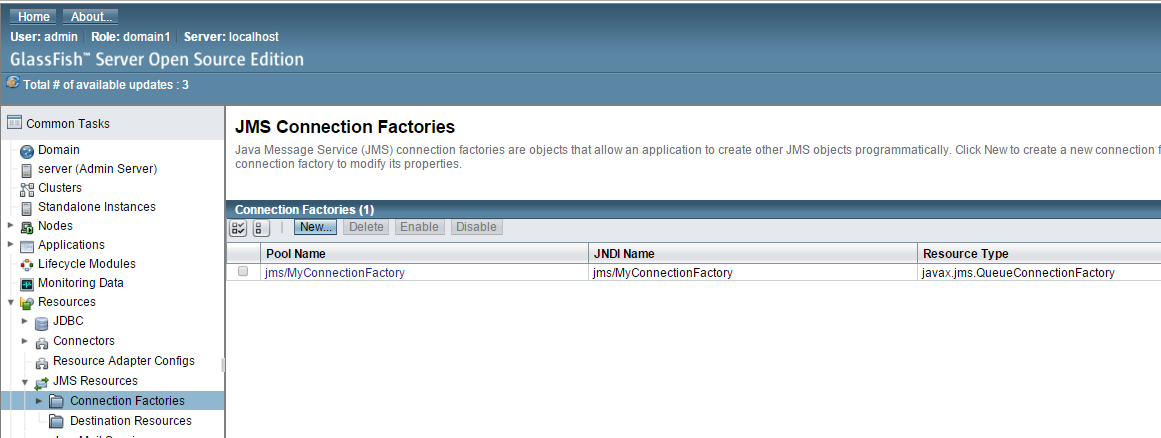
To start configuring JMS we need to define a connection factory
The connection factory interface is an administered object, used to create the connection with the JMS provider.
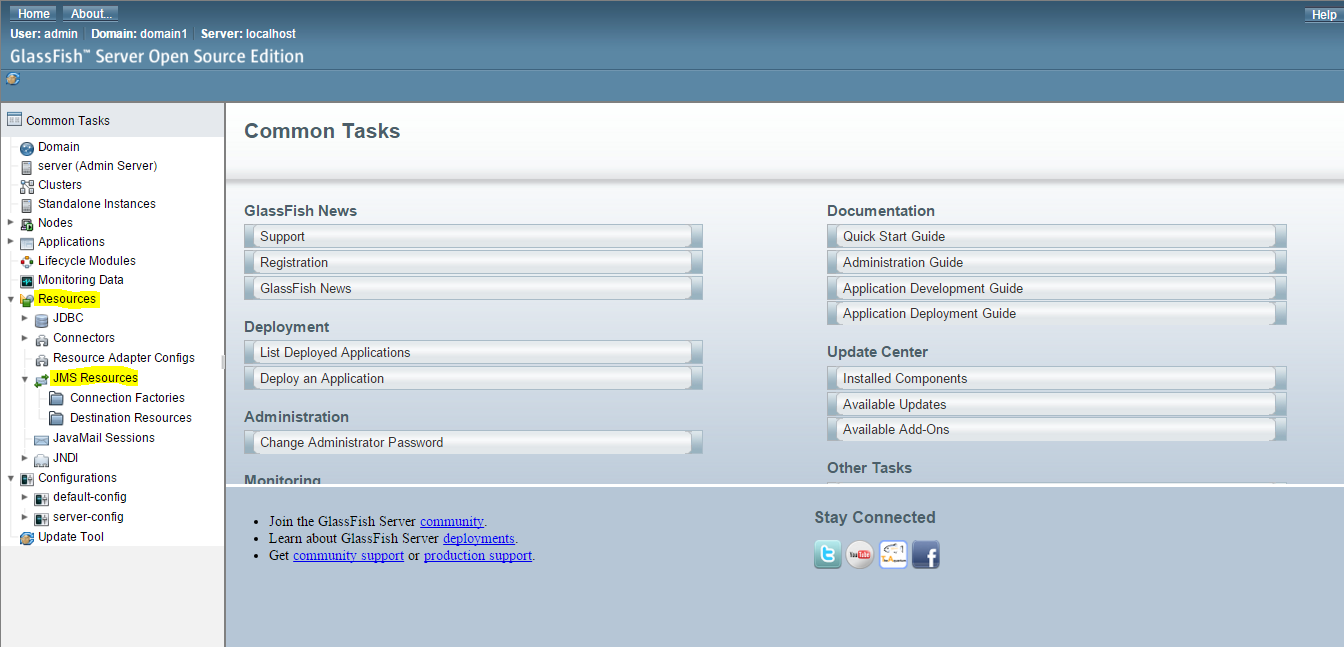
So, select Resources/JMSResource/ConnectionFactories/ New:
In this new window complete:
- PoolName
- ResourceType
- Description
- Check the enabled status
- The pool settings can be left as by default.
Click OK
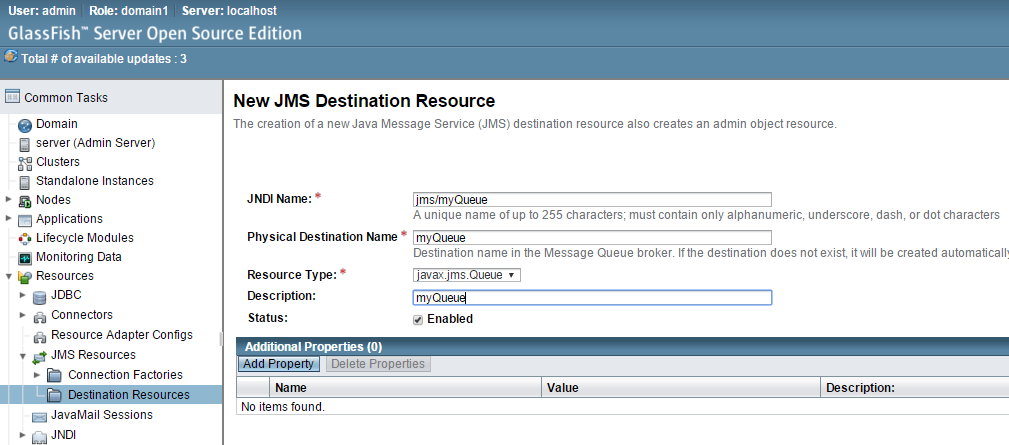
Now, that the connectionFactory has been created, it is necessary define a destination resource (it could be destination, queue or topic). In this example we will define a JMS point to point so we will select queue:
Select Resources/JMSResource/DestinationResources/ New:
In this new window complete:
- JNDIName
- Physical Destination Name
- ResourceType : select javax.jms.Queue
- Check the enabled status
Click OK
Now JMS resources have been defined in the server, and we can use them to handle messaging in our application.
Saturday, 13 February 2016
Java Web Component Developer Certification OCEJWCD at a glance
OCEJWCD (SCWCD) - 1Z0-899 - Web Component Developer Certification
This post a is summary of info related Oracle JavaEE6 web component certification with all info available in this blog and other useful links:
Topics:
Exam:
Further resources:
Good luck!
OCEJWCD (SCWCD) - 1Z0-899 - Web Component Developer Certification
This post a is summary of info related Oracle JavaEE6 web component certification with all info available in this blog and other useful links:
Topics:
Exam:
- Number of questions: 57
- Passing score: 64 %
- Duration: 140 min
- Further information about cert exam: certification.oracle.com
- Scheduling an exam : pearson vue
- My experience with the exam in this post
Further resources:
- Books. I used HeadFirst Servlets & JSP (O'Reilly), but there are others like OCEJWCD Study Companion recommended in javaRanch.
- Servlets 3.0 specification. You can download the JSR-000315 from here
- Java EE 6 API here
- MockExams:
- Free Tutorials:
- Sun Certified Web Component Developer Study Guide download pdf download from Javaranch site
- Tutorials point: JSP tutorial
- Tutorials point: Servlets tutorial
- Java Servlet technology in the JavaEE 6 tutorial from oracle
- Forum about Web Component certification at CodeRanch, including experiences and results, and useful links and materials
Good luck!
OCEJWCD (SCWCD) - 1Z0-899 - Web Component Developer Certification
Friday, 5 February 2016
Microservices
Nowadays it is quite common to hear about the microservices architecture. What is the meaning behind the concept of microservices? Why is it changing the way of building software? I will try to summarize in this post the basic notions about microservices.
A valid definition of Microservice can be the functionality that is deployable independently, for building a system in a modular way.
Traditionally the projects in an organization are characterized by being monolithic. That means a project or group of projects with their dependences that are deployed as one entity. These projects share a database and are coded using the same language.
On the other hand, microservices will have their own services and their own database. Also they do not need to use the same language, so the best technology can be used for each problem.
Microservices architecture also solves a problem related with scalability. In a monolithic architecture as the project increases it needs more hardware resources (servers or containers).
There is a very popular article about microservices in the Martin Fowler blog:
A valid definition of Microservice can be the functionality that is deployable independently, for building a system in a modular way.
Traditionally the projects in an organization are characterized by being monolithic. That means a project or group of projects with their dependences that are deployed as one entity. These projects share a database and are coded using the same language.
On the other hand, microservices will have their own services and their own database. Also they do not need to use the same language, so the best technology can be used for each problem.
Microservices architecture also solves a problem related with scalability. In a monolithic architecture as the project increases it needs more hardware resources (servers or containers).
There is a very popular article about microservices in the Martin Fowler blog:
Some main ideas about microservices:
- Service oriented
- Products instead of projects.
- Smart endpoints and dump pipes communication pattern. Note :To know more about the meaning of this pattern you can read this explanation from stackoverflow. This pattern is the opposite to the use of enterprise service bus (ESB).
- Microservices involves a team will be responsible of development, build, deployment, maintenance.
- Decentralized data management: Microservices uses their own database. Managing distributed transactions can be a drawback, due to the need of synchronizing data.
- Design for failure: it means that if one component fails it does not affect the others.
- Infrastructure automation: Continous deployment, a change only requires deploying the microservice, not all the application as in monolithic architectures.
Subscribe to:
Posts (Atom)